I'm finally back from maternity leave and ready to teach (kinda)! Can I bring my baby with me? Can he be my assistant? No? Awe. :(
Towards the end of the last school year, I came back from my maternity leave early so that I could work the two days of post-planning. I decided it would be best if I were the one to clean up and put away my classroom, so I’d know where everything was when I officially returned. Last school year, we had to take EVERYTHING off of the walls so that our custodial staff could clean them during the summer. And while it was a pain to take everything down, it did give me a blank slate for the new school year! Fun Fact: My classroom looks HUGGGGEEEE when it’s empty!
This post contains some relevant affiliate links.
SET OF DRAWERS
Before I went back for pre-planning this year, I started work on a colorful new set of drawers for my classroom. The idea was that I would use each drawer to store all of my prepped paper for each of my grade-level projects (that way it wouldn’t end up all over my desk and every other flat surface in my room like usual). So I got online and found the perfect set of drawers from Target. As you can imagine I was overjoyed when I saw that the drawers could hold 12″x18″ paper – an art teacher’s dream! Unfortunately in all my excitement, I neglected to thoroughly read the product description and ended up buying a unit whose overall dimensions were 12″ deep by 18″ long; the drawers themselves were much smaller. And of course I didn’t realize all of this until after I had already primed and repainted all the drawer covers and assembled the whole thing.
Upset with this realization, I took to Instagram where a fellow art teacher gave me the amazingly awesome idea to use the drawers to organize my scrap paper by color instead.


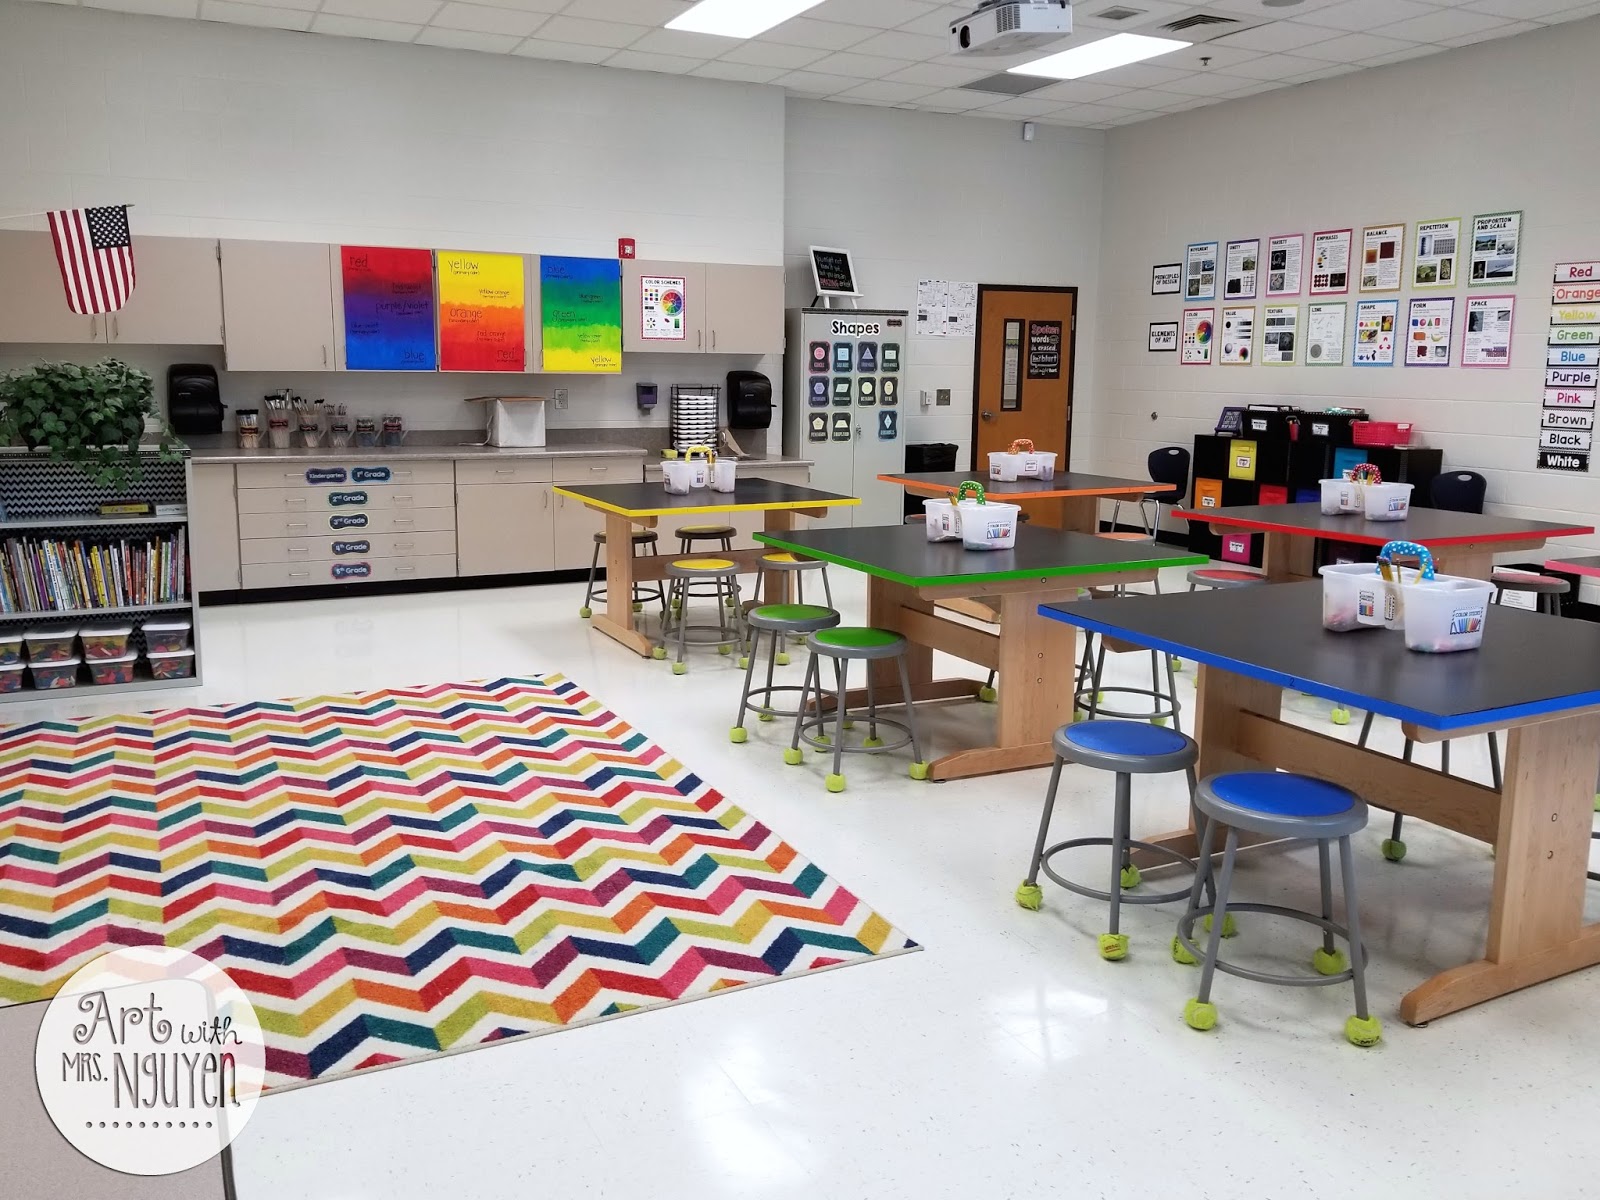
TABLES AND STOOLS
Once pre-planning started it was all about getting my classroom put together.
My first project was to paint the edges of my tables and stools to color-code them!
 After sanding, I cleaned off the laminate shrapnel, then taped off the table edges and started painting using a small roller and Behr Marquee paint (this paint already has the primer mixed into it). Each table took about 3 coats to fully cover the sides (I wasn’t using the 1-coat guarantee colors). After the paint was dry, I removed the painters tape and then used an oil-based sharpie paint marker to write my table numbers (I use these for classroom jobs). Once that had a chance to dry, I painted overtop of everything with coat of glossy mod-podge.
When painting my stools, I just went straight in with the paint and then covered with mod-podge as well (in retrospect I could have done without the mod-podge on the chairs).
After sanding, I cleaned off the laminate shrapnel, then taped off the table edges and started painting using a small roller and Behr Marquee paint (this paint already has the primer mixed into it). Each table took about 3 coats to fully cover the sides (I wasn’t using the 1-coat guarantee colors). After the paint was dry, I removed the painters tape and then used an oil-based sharpie paint marker to write my table numbers (I use these for classroom jobs). Once that had a chance to dry, I painted overtop of everything with coat of glossy mod-podge.
When painting my stools, I just went straight in with the paint and then covered with mod-podge as well (in retrospect I could have done without the mod-podge on the chairs).**UPDATE: This particular type of paint didn't stay very well (still very pickable). So I took it off and repainted with Martha Stewart multi-surface acrylic and sealed it with Delta Creative polyurethane varnish. It is working INSANELY better.

TABLE BUCKETS

This year I used the same type of bins I've used in past years.. but got some nice new ones that weren't colored all over (who doesn't love shiny and new?). To color-code the bins I once again used ribbon. Click here to see how to attach it!
I also created some new labels and then added those on as well to help my students know where to put things away.
CENTERS

Once again, I will be using art centers as part of my classroom management plan!

Weaving/Lacing Cards - 1 pt
White Boards - 1 pt *This is the one bone that I throw my students. They LOVE white boards!
How to Draw Books and Free Draw - 2 pts
Pattern Blocks - 3 pts
Texture Rubbing - 4 pts
Puzzles - 5 pts
Origami - 6 pts
Spirograph  - 7 pts
KEVA Contraptions -7 pts.
K'NEX - 8 pts
Play Doh - 10 pts
Jewelry Center - 14 pts
ELEMENTS AND PRINCIPLES POSTERS

VISUAL ART WORD WALL CARDS
 My word wall is probably the single most popular thing in my classroom with my administrators. My thought when I created them and first hung them up was "Cool! Now my kids can see art words and pictures that help those words make sense." My administrators think "Wow! She's incorporating literacy into her art program!"
At the end of last year I took down all my word wall cards and tossed them, so this year I had to print them all out again (which was fine with me because I'm made a million updates to them over the past few years).
Once I had them all printed out I knew I needed to laminate them. Trying to get stuff laminated through the school in the beginning of the school year can be a bit challenging however, so I decided it was time to invest in my very own home laminator!
 Guys... I WANT TO LAMINATE EVERYTHING NOW! I mean.. the process of laminating itself is fun AND cutting out things that are laminated is fun. There's just something very rewarding about cutting through laminated paper. Either you know exactly what I'm talking about, or you think I'm crazy. That's okay. I probably am. ;)
I personally bought my laminator at Wal-Mart for about $20... but you can also order the same Scotch Thermal Laminator from Amazon (theirs comes with 20 laminating pouches).
Once I had all my cards laminated it was time to cut them out. Lucky for me I recently purchased an X-ACTO Commercial Grade 12" x 12" Paper Cutter (off of Amazon) which made cutting them out at home WAY easier. Seriously Amazon gets all of my money. Their 2-day Prime shipping is dangerously convenient.

 I decided that this year I was going to hang up my word wall cards on my bulletin board instead of the wall so I wouldn't have to cut like 30,000,000 pieces of tape to stick them up. Yay for staples!
The only thing I didn't consider before starting was how to keep the cards straight on my bulletin board. 😔 By the time I got to the letter "D" I noticed that my cards were gradually moving upwards. Soooo I took them all down and started again. I'm going to be real with you guys.. I did this a few times.
Then FINALLY I figured out an easy way to keep things on track; I measured how far down from my border I wanted the word wall cards to start, and then put a staple at that height along the length of the bulletin board.


 When students are working on dry artwork at their tables, I have them put their work into their table folder at the end of class. The table folder consists of a sheet of 12"x18" construction paper folded in half with the grade-level written on the front. These folders are then stored in my labeled grade-level drawers. So the next time students come to class, I can just put their folder on their table so they can pull out their work and get started (no time wasted calling out names).
 If their work is wet and needs to be put into the drying rack, I have them place their work on a 1/4 size sheet of posterboard and then slide it into the drying rack within the their table color band (added with colored masking tape). That way work is easily accessible for students to get from the rack or if I want to put stuff up into their table folders once it's dry, I'll know which folder they go into.
To help me tell my grade-levels apart (in case they're doing similar projects) I have clothespins with grade-level tags on them that I just clip onto the top of each drying rack.
If their work is wet and needs to be put into the drying rack, I have them place their work on a 1/4 size sheet of posterboard and then slide it into the drying rack within the their table color band (added with colored masking tape). That way work is easily accessible for students to get from the rack or if I want to put stuff up into their table folders once it's dry, I'll know which folder they go into.
To help me tell my grade-levels apart (in case they're doing similar projects) I have clothespins with grade-level tags on them that I just clip onto the top of each drying rack.
 Aside from my table buckets (which contain pencils, erasers, colored pencils, color, sticks, and crayons) I have a couple of other ways of storing ready-to-go materials.
First are the color-coded baskets I have. If I'm doing a project with a class that has a LOT of materials, I will often use these buckets to pass out supplies for each table. Otherwise I would just call table numbers (how I distribute jobs) and have them come pick up various things.
 Last year I also started taking advantage of the cabinet storage I have under my countertops and started prepping paints for different classes and storing them under there in copy box lids. At one point I had all this stuff spread out all over my countertop and knew there HAD to be a better way.
Using the copy box lids allows me to quickly take out and put away supplies without the giant mess.
Last year I also started taking advantage of the cabinet storage I have under my countertops and started prepping paints for different classes and storing them under there in copy box lids. At one point I had all this stuff spread out all over my countertop and knew there HAD to be a better way.
Using the copy box lids allows me to quickly take out and put away supplies without the giant mess.
 Last year I also started storing my paintbrushes in labeled drink pitchers. Why? Because it is WAY easier to walk around to distribute them when the container has a handle!
 And finally - paper storage. I used to have a cardboard holder like this when I was at my old school, but then neglected to bring it with me when I changed schools. This one isn't a revolutionary storage tip - unless you've never used one before. In which case - BOOM! Just blew your mind with its awesomeness!

 My word wall is probably the single most popular thing in my classroom with my administrators. My thought when I created them and first hung them up was "Cool! Now my kids can see art words and pictures that help those words make sense." My administrators think "Wow! She's incorporating literacy into her art program!"
At the end of last year I took down all my word wall cards and tossed them, so this year I had to print them all out again (which was fine with me because I'm made a million updates to them over the past few years).
Once I had them all printed out I knew I needed to laminate them. Trying to get stuff laminated through the school in the beginning of the school year can be a bit challenging however, so I decided it was time to invest in my very own home laminator!
 Guys... I WANT TO LAMINATE EVERYTHING NOW! I mean.. the process of laminating itself is fun AND cutting out things that are laminated is fun. There's just something very rewarding about cutting through laminated paper. Either you know exactly what I'm talking about, or you think I'm crazy. That's okay. I probably am. ;)
I personally bought my laminator at Wal-Mart for about $20... but you can also order the same Scotch Thermal Laminator
Once I had all my cards laminated it was time to cut them out. Lucky for me I recently purchased an X-ACTO Commercial Grade 12" x 12" Paper Cutter

 I decided that this year I was going to hang up my word wall cards on my bulletin board instead of the wall so I wouldn't have to cut like 30,000,000 pieces of tape to stick them up. Yay for staples!
The only thing I didn't consider before starting was how to keep the cards straight on my bulletin board. 😔 By the time I got to the letter "D" I noticed that my cards were gradually moving upwards. Soooo I took them all down and started again. I'm going to be real with you guys.. I did this a few times.
Then FINALLY I figured out an easy way to keep things on track; I measured how far down from my border I wanted the word wall cards to start, and then put a staple at that height along the length of the bulletin board.
Helpful tip: Hang your word wall cards BEFORE you hang your bulletin board letters. The letters "C" and "S" have like a gazillion cards, while the letter "U" only has one.
If you like my word wall cards, check out my store!
If you like the bulletin board letters, you can find them here! *I warn you to not use them on a black background however. Hah! I wish I would've thought that one through!
PROJECT ORGANIZATION/STORAGE
Like I mentioned before, I see my students a few days in a row before getting my new rotation, so the way I organize and store artwork may not be applicable to your situation.
 When students are working on dry artwork at their tables, I have them put their work into their table folder at the end of class. The table folder consists of a sheet of 12"x18" construction paper folded in half with the grade-level written on the front. These folders are then stored in my labeled grade-level drawers. So the next time students come to class, I can just put their folder on their table so they can pull out their work and get started (no time wasted calling out names).
 If their work is wet and needs to be put into the drying rack, I have them place their work on a 1/4 size sheet of posterboard and then slide it into the drying rack within the their table color band (added with colored masking tape). That way work is easily accessible for students to get from the rack or if I want to put stuff up into their table folders once it's dry, I'll know which folder they go into.
MATERIALS STORAGE
 Aside from my table buckets (which contain pencils, erasers, colored pencils, color, sticks, and crayons) I have a couple of other ways of storing ready-to-go materials.
First are the color-coded baskets I have. If I'm doing a project with a class that has a LOT of materials, I will often use these buckets to pass out supplies for each table. Otherwise I would just call table numbers (how I distribute jobs) and have them come pick up various things.
 Last year I also started taking advantage of the cabinet storage I have under my countertops and started prepping paints for different classes and storing them under there in copy box lids. At one point I had all this stuff spread out all over my countertop and knew there HAD to be a better way.
  Last year I also started storing my paintbrushes in labeled drink pitchers. Why? Because it is WAY easier to walk around to distribute them when the container has a handle!
 And finally - paper storage. I used to have a cardboard holder like this when I was at my old school, but then neglected to bring it with me when I changed schools. This one isn't a revolutionary storage tip - unless you've never used one before. In which case - BOOM! Just blew your mind with its awesomeness!
I'm so glad I got one again. :)
HALL PASSES

Over the past few years, the teachers at my school had been using laminated paper hall passes for our students. The main problem with those though were that they would come back from the bathroom with wet spots on them (is that water or something else?). Eww.
So this year our principal had us make our own instead. As she was telling us about this during our staff meeting, she happened to have an example picture of a hall pass on a paintbrush on the PowerPoint slide. Obviously I immediately fell in love! To see my how-to on these paint brushes click here.
Now they hang on the back of my door!

GENERAL CLASSROOM DECOR
These are a few of the other things I have hanging up on my walls.

I made these color posters to complement the bulletin board letters I made for my word wall. :) You can get a copy of them here!

I moved my shape and form posters from last year onto my large metal storage cabinets so they wouldn't just be wasted space.

I also repainted these color mixing posters that I had originally created a few years ago. My old ones were looking pretty worn down.
If you don't want to paint your own, consider checking out my TPT store for some smaller printables.
CLASSROOM PICTURES
If you have questions about anything else you see, please feel free to leave me a comment and I'd be happy to talk to you about it! :) Hope you all have a great school year!